Sunday, March 25, 2012

Superhero Preview: Layout #1!

This is a pretty exciting and unique paper pack! It has been a lot of fun to create with! The Superhero Kit from Close to my Heart includes papers that are comic strip, table of elements, red white and blue stripes, blue stars, and red dot patterns. It comes with an exclusive stamp set with images of star-bursts, trophy, star zig-zag border, "super kid", "wow!", "way to go!", "Totally Terrific", "Good Job!", and "Fantastic". It also comes with adhesive back badges and accents with superheros, stars, and lightning bolts. There are also chipboard stars to work with. We will be using the colors: Black, Cranberry, Moonstruck, Sky, Sunkiss Yellow, and White Daisy.

Superhero Layout#1: 3 vertical 4x6 photos
This is the first 2 page scrapbook layout I have created with Superhero. I found a sketch for this layout that was part of a contest submission, but I had trouble ordering my photos in time to submit it! I like this layout because it is great for something you want to scrapbook, but you don't have a lot of photos. I also thought it was a great opportunity to use the zipstrips. This kit comes with a zipstrip that has little sayings on it, so it is fun to cut what works for your pictures and add them as accents.

Clouds from the "Over the Rainbow" stamp set.
Sentiment from "Card Chatter- Sympathy" stamp set. Layered onto the star-burst stamp from the Superhero Kit.

I combined the stamp set "Over the Rainbow" (D1426)- I used it to create the clouds. I also used "Card Chatter- Sympathy" for the sentiment that I layered over the star-burst which reads "chase the clouds away".


I added journaling with long thin pennant strips. The white really pops against the Moonstruck blue. I also really like the stars on this zipstrip, so I added a chipboard star accent that I stamped repeatedly with the star zig-zag stamp in sky blue ink.

If this looks like a layout you would like to learn to create with me- then you won't want to miss the workshop being held on April 21st! Find the details here! Facebook Event on Heather Jane Design

Visit my CTMH website for more information about this kit and our other products! www.heatherjane.ctmh.com

Tuesday, March 20, 2012

"Happy Easter to my Peeps"

One of my most favorite stamps sets from the Spring Summer 2012 Close to my Heart idea book is "My Peeps"! I decided it was a good stamp set to use on giving the Center Step card fold a try for the first time too!


Creating a Center Step card was a lot easier then I thought it would be! I found Sandy's blog where she posted a template on how to do it! (Thank you Sandy!) I was able to print it out and use it while I measured twice and cut once! :) Here is a link to her blog post if you would like it for yourself as well: "Creative Moments With Sandy"- Center Step Card Template.

Center Step Card Template from Sandy!
This is what my card looks like when it is not folded for display or card mailing. This photo will help you to see where I cut and scored to fold.


I love that I could send this creation as a card and the recipient could use it as a decoration! I might need to make one for myself to decorate with!

Fork Bow How-to from Eskimimi Makes

I tied the ribbon after reading a tutorial form a fellow crafter's blog. I found it at Eskimimi makes blog. Here is a link to the tutorial: Eskimimi Makes, Fork Bows! Thank you Eskimimi for creating this! I am amazed at how easy it is to make bows! I avoided making bows before because every time I tried I felt like I was just fumbling around with too much effort and no fruitful outcome. Now I am no longer afraid of tiny bows! I used a dinner fork to create a small one with a 6" piece of ribbons. I also tried it on a larger serving fork and used an 8" piece of ribbon. Just be sure your fork has four prongs!


The new springs from Close to my Heart are a lot of fun to play with! The plump belly of this peep is the perfect size to conceal the spring. When the card is on display it happily bobbles and wobbles. It makes me smile with Easter cheer! :) They were easy to use, just peel off the white paper and leave the adhesive film layer, then stick in place.

Thanks for looking! Hope you have a Happy Easter, Peeps!

My list of supplies:
- "My Peeps" stamp set $9.95
- "Lucy" background and texture paper (pink side)
- "Blush" cardstock
- "Sweetleaf" cardstock
- "Hollyhock" Ink Pad
- "Daisy White" 3/8" grosgrain ribbon
- Adhesive Springs
- Center Step Card Template from Sandy's blog
- Ribbon on a Fork Bows Tutorial from Eskimimi Makes blog

Sunday, March 18, 2012

"A Hop" Easter Card

The now retired. "A Hop" stamp set from Close to my Heart is irresistible! When I saw it the bunny screamed "chocolate!" and "bunny butt!". Heehhehe.

I stamped the bunny in "chocolate" ink so that he would really look "chocolate". But then I didn't stop there, I HAD to add a googly eye and fuzzy ("bunny butt") tail! I loved the look of the chocolate with "blush" (pink) and "sweetleaf" (green). I also always love the crisp look of white grosgrain ribbon against almost anything!

 I thought this stamp set was perfect to pair with the MojoMonday card sketch challenge MOJO232.

What do you think? I am considering creating another card with this bunny, but somehow take a "bite" out of him... What are you making for Easter?

(I apologize that my photos are not coming out well. I was gifted a hand-me-down camera that I don't know how to use yet and it keeps loosing all of my settings!)

Monday, March 12, 2012

Craft Room Prep: Type Tray and wooden boxes

We have been building a craft room and play room in our basement for what feels like forever. We have been in a holding pattern for a while waiting for time and funding to line up together. How do I stay sane while waiting? I have thrown myself into research of organizational options. I have an overflowing pinterest board to prove it! Now that I have zeroed in on a few options that I know will be perfect for me I am ready to get them started. Up first: Spray painting the type tray and wooden boxes.


Yesterday was a beautiful almost spring day. The temperature was perfect for spray painting outside! Enter the spray paint items from my craft room to do list. I found 4 partial or almost empty cans on white spray paint in the basement. I milked every last drop out of them for this project. (I have the blister on my trigger finger to prove it!)


Type Tray: This will be the future home of the wood mount stamps that I reach for most. My zyron sticker maker and clear plastic jars fit in a few of the spots as well. I will hang it on a wall near my main work space. I found this at a garage sale and held onto it for about 2 years now. I'm glad I did, they can be hard to find. If you get them at an antique store they can be pricey. I might keep an eye out for a 2nd one at the local Goodwill store and other garage sales.

Wooden Boxes: I found these at a garage sale also and have held onto them for about 5 years now! I have no idea where to find these at a retail store. (If you recognize these and know where to get them please let me know so that I can share the info).

These boxes fit my Close to my Heart stamp sets perfectly! I plan to use one to hold the stamp sets I have current projects for. The other for holding the stamp sets that are drying after cleaning or are ready to be put back. This plan may evolve once my craft room is up and running. But for now I will use them in this way.

I can't wait to see the white pop against my purple and teal walls! Yippee! I will update this post in the future when I have "after" photos.

What are some of your favorite craft room preparation projects that you are working on or have recently completed? I would love to hear about them!

Sunday, March 11, 2012

Purple and Teal!


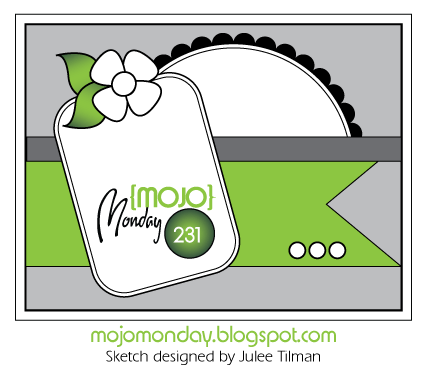
The Mojo Monday sketch challenge this week was perfect for creating a Birthday Card for a friend! 


I used shades of Purple and Teal! A new favorite color combination of mine! Instead of a flower I used a 3D punch of a butterfly. Instead of a circle and a scallop layer I used a flower stamp and cut it out by hand.


Supplies Used:
- Rich Razzleberry Cardstock (Stamping up)
- Lagoon Cardstock (Close to my Heart)
- Elemental Paper (CTMH)
- Lagoon Ribbon (CTMH)
- Bitty Adhesive Pearls (CTMH)
- Corner Rounder (CTMH)
- Butterfly Paper Punch
- Pemberley Stamp Set (CTMH)
- Afterthoughts Stamp Set (SUP)
- Whisper White Smooth Cardstock (SUP)

Links:

Wednesday, March 7, 2012

Baby Card, Initial!

I wanted to make a special card for some friends who had just celebrated the arrival of their new baby. I wanted it to showcase the first gift that they give their baby, his name. I honored that by using his initial on the face of the card.


I used soft spring colors for this baby themed card. The card base is card stock in sweet leaf green. The yellow patterned B&T Duo paper is from the Pemberley paper pack from close to my heart- it is a beautiful delicate pattern and sweet shade of yellow. The wave accents were created with sky blue ink and the border stamp from the SuperHero workshop on the go kit. The letter "E" was cut on my cricut with Art Philosophy cartridge in daisy white. I love the crispness of the white against the other three colors.


I took inspiration from the sketch challenge at Retro sketches. The sketch was for a horizontal card, but I flipped it into a vertical orientation.


Links:
Retro Sketches Challenge
Heart to Heart Blog Challenge- Spring Color Challenge
Cas-ual Friday Blog Challenges- Hey Baby!

Monday, March 5, 2012

Pemberley Workshop Preview! Cards!

1 dozen cards created with the Pemberley Paper Pack

The Pemberley Workshop that is happening on the 24th of March will not be limited to Scrapbook pages! You can choose to create one dozen cards instead! The card designs were inspired by the scrapbook pages and translated into card versions. You will have so much fun creating these! Let's take a closer look at what you will take home when you leave the workshop.

Card #1: Layered flower stamped in Honey ink with bitty adhesive pearls!


Card #2A: Uses the zip strip as the card sentiment and design element.


Card #2B: The large flower cutout is simple and beautiful in this design. We will use "Card Word Puzzle" coordinating rose stamp to decorate the envelopes.


Card #3A: Large cutout butterfly is glued to the card surface in the middle, but raised up at the end of its wings on 3D foam tape.


Card #3B: The hexagon shapes are flipped over to show the beautiful yellow pattern on the other side. We will stamp butterflies and color in with colored pencil and white gel pens.


Card #4: Simple, quick, and beautiful. These colors and patterns go together so well, there is really nothing more that needs to be done! :)


When our supplies arrive I will deliver your order to you. If you have chosen to create cards I will insert the card cutting guide for you to use to prepare before class. You will cut out all of your card stock and paper ahead of time so that we will have time to stamp and assemble at the workshop. Please contact me if you have questions while you are cutting.

Here are a few close-up pictures of some of the fun details!