Wednesday, July 27, 2011

August Stamp of the Month "Wicked"


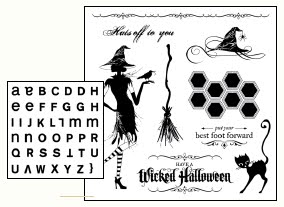
August is nearing, and so is the NEW stamp of the month! AND the NEW stamp of the month earning structure! As a Consultant I was able to recieve the stamp set early so that I could use it to create examples for you. So when I saw this weeks Color Dare was colors that also work with the stamp set I got inspired! Look at what I created!


How to create this witchy-hat! I stamped the hat with the swirls stamp first on white cardstock in the smokey plum ink. I then cleaned it and let it dry. Then I stamped it on another seperate piece of white cardstock in Black Archival Ink. After it dried I cut out just the black hat shape. Then I glued it on top of the hat on the purple version I had stamped. (I used my snail adhesive). To make the black hat glossy and shiny I then applied my "Liquid Glass" (clear acrylic). I used the tip to push around the liquid and cover the entire hat with a thin coat. I left it out in a safe spot overnight to dry. In the morning it was nice and shiny!

This stamp set can be yours during the month of August for only $5 if you place a $50 order! Retail value is $17.95. As an added bonus for August only if you make the $50 purchase AND get the $5 Stamp of the Month, you qualify for a FREE alphabet set titled "A Typeface"! Get yours right away to start creating your Halloween Cards, Invitations, and Scrap Book Layouts!

Thursday, July 21, 2011

Color Dare Entry, Pear, Goldrush, and Chocolate


I just found a new blog that posts a new "Color Dare" on each Tuesday! So, this week I am taking part in it! I had so much fun creating this! Let me know what you think of my entry.

I made a little pun of the presence of the color Pear, and used the stamp "Pearfect" as my header! :) To create the Pear itself I used all three shades of ink. I stamped the pear in PEAR first. Then I cleaned the stamp and switched colors to GOLDRUSH. I inked just the stem and one side of the pear that I was pretending was "farthest from the imaginary light source". I inked the goldrush color across just less them half the stamp. Because my stamp set is clear I can see right through it and line up exactly where I want to stamp, so I layered the goldrush right on the pear ink. Then I cleaned the stamp and switched the CHOCOLATE. I inked up only the stem and a thin edge of the stamp. I then looked through my stamp and layered it again.

This is what is so exciting and fun about owning CLEAR stamps from Close to my Heart. Being able to see exactly where I am placing my ink gives me more control and more design techniques and options!

If you want to participate next week, check out this blog on Tuesday to see what the NEW "Color Dare" is! http://ctmhcolordare.blogspot.com/

Friday, July 15, 2011

"Sophia" Kit Scrap Book Workshop!

The lovely "Sophia" Scrap Book Kit will be the focus of my first Scrap Book Workshop! I will be teaching a few friends how to create a variety of 2 pages layouts from the Close to my Heart product line of kits. *** To join my class please order your kit from me before 10pm on Monday July 18th 2011.*** Our Sophia class will take place on a Wednesday following the arrival of the kits. The kit is $34.95 AFTER tax and shipping are applied. I will have the kit shipped to me so that I can process the kit and pre-cut many of the papers so that we can create our pages in the time we have.

Here are the beautifully girlie layouts I have created from my own kit! Under each photo I will list for you what size photos are used, that way you can prepare your photos if you like.

Above is the Featured Layout with the kit: 2- horizontal 5x7 photos, 6 2x2 photos

Above Layout is the Alternate design: 1- horisontal 4x6, 3- vertical 4x3 photos (From the "Magic" book)

Above layout is "Mystify" from the "Magic" Book: 5 1/2 x 9 1/2 photo (print an 8x10 horizontal and trim it down, great for a group photo!), 1- vertical 5 1/2 x 4, 3 or 4- vertical 4x6. We will use a flip flap for this page!

Above layout is "Monologue" from the "Imagine" book. 2- vertical 4x6, 1- horizontal 4x6, 1- horizontal 4 1/2 x 5, 2- 3x3

Above layout is "Subtitles" from the "Imagine" Book: 1- 8x8, 4- 3x3, 2- horizontal 3 1/2 x 5

Tuesday, July 12, 2011

Jumping back into Scrap Booking!

I am so excited to jump back into scrap booking! It feels good to finally get serious about creating the scrap book albums I always pictured I would create as keepsakes for my children! I have to be honest and admit that my kids are 2 and 4 and I am just getting started. I did the hard part already, I documented and saved and packed away all the important information. Now I need to print the digital pictures and get started on the FUN part, putting it all together and showing it off!

I am so excited to have discovered Close to my Heart and their amazing line of scrap booking supplies! Now I can create my albums knowing that I am using high quality archival materials. Plus, they have great advice on color groups and layout designs!


I created this layout with "flip-flaps"! I had never heard of them before, and now I LOVE them! My sister had done a photo-shoot of my daughter and I had so many photos that I loved that I could not trim the collection down to fit on two pages... until I discovered the magic that is flip-flaps!


I was able to use this 4x6 clear archival safe photo pocket to layer an extra photo on top of a base photo that is on my 12x12 page and already slipped into the 12x12 protector. I can even add another photo or a journal space to the under-side of the flap! They are also very affordable! (15 4x6 size for just $3.95!)

I will be posting other photos soon of the layout pages I created with the "Sophia" kit! I will be hosting a workshop to teach how to create them in the next couple of weeks!

Friday, July 8, 2011

Recent Card Making Workshop!


Wanted to share a few pictures and highlights from my recent Card Making Workshop! We did a "card buffet". There were 6 designs and enough supplies for each attendee to create 2 in each design. Guests could choose how many cards they wanted to make. Each card was $1.50 based on cost of supplies only.

The designs shown for this class were all created by me. I photo copied each card and made a recipe sheet with measurements and important steps. Guests were very excited to take home the "How-to's"!


If this sounds exciting to you send me a message and I an add you to my list to be notified of future card and scrap-booking classes I plan to host!