Monday, March 5, 2012

Pemberley Workshop Preview! Layout #4!

I have had so much fun working with the Pemberley WOTG Kit! I can't believe how well they have matched up with the stack of pictures from Easters past that I have needed to scrap! I used Layout #4 for another Easter page for my son!

Used pattern "Mesmerize" from pg 34 of Magic How to Book. Photos Sizes: 1 V 5x7, 2 H 4x5, 2 V 5x3, 2 H 2.5x3.

I really like these colors together! Desert Sand brown, Indian Corn Blue, Colonial White, and Bamboo!  I also love how this layout really showcases the zip strip. This one with the dots and butterflies is SO cute!


For stamping on this layout I added the large flower that comes in the Pemberley Stamp set. We will stamp it in Bamboo ink along the right side of the left page. The we will stamp the dragonflies in Indian Corn Blue ink. I added the sentiment "I love you".


There is a 4x3 V journaling spot on the left page. I used the adhesive pearls that come with the kit as bullet points for the memories I listed on my journaling area. I love how easy these pearls are to use since they already have the glue on them.

Saturday, March 3, 2012

Home Sweet Home

The "Tuesday Trigger" from the Moxie Fab World blog was too cute to resist taking part in! Take a look at this inspiration photo!


I zeroed in on the woodgrain and the bird theme. This challenge was the perfect excuse to use my "Bless this Nest" stamp set from Close to my heart. I created the front of my card with the same proportions shown in the inspiration photo. Red at the top, then a green scallop accent, then a textured square.


Instead of a "window" I used this area for a sentiment. Instead of a woodgrain door I used a cute little wooden bird house. My favorite part is the pair of birds perched up high on the scallop ledge.


Friday, March 2, 2012

Roar! Dinosaur Birthday Cards!

When the New Close to my Heart Idea book came out the stamp set "Roar" caught my eye. I could not wait to get my hands on it! The adorable dinosaurs... The witty puns in the sentiments... :)


Dinosaurs are the perfect theme for creating Birthday Cards for boys or girls. In this case I created a Birthday card for my Little Brother. He has autism and is amazed by anything "big". Dinosaurs definitely fit that requirement! Today we had a snow/ice day so the kids were home from school with me. We worked on our cards together and talked about how excited Uncle Aaron will be to receive so many cards in the mail!


On my card I used the color scheme suggested by the current Colour Q Challenge. I found similar colors in my collection of supplies.


The February sketch challenge from Heart 2 Heart was the perfect pattern for the card I wanted to make. I used the bones as the vertical element and layered it with scrabble tiles cut out from a paper in the "Cruisin" Paper Packet from Close to my Heart. Instead of a heart I placed my Dinosaur, looking up at the name.


For my Dinosaur I stamped it once in Cocoa on paper from the Victory Paper Packet and then trimmed it out and glued it right on the card. Then I stamped the Dino in Sunset ink on white and trimmed him out and placed him slightly out of alignment with the brown one and raised up on 3D foam tape. This was all an effort to create a "shadow".

Supply List:
Roar Stamp set from Close to my Heart
Card Word Puzzle Stamp Set from CTMH
Green, Yellow, Orange, and white cardstock
Victory and Cruisin paper
Googley eyes
Liquid Glass (to glue eyes)
3D Foam Tape
Sunset, Cocoa, and Pear Ink Pads

Wednesday, February 29, 2012

Pemberley Workshop Preview! Layout #3!

I found some pictures from Easter of last year and was so excited that they would go really well with the Pemberley Kit from Close to my Heart! My son had worn a brown outfit and the shades of paper and cardstock in the kit were the perfect fit!
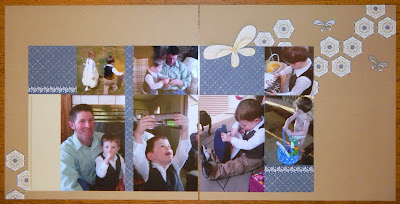
Pemberley Workshop Scrapbook Layout #3: Based on "Love Potion" pattern from the How to Book titled "Magic" pg 18
Desert Sand was the perfect page base to build upon with the navy patterned side of the coordinating paper. I hand trimmed the butterfly to symbolize spring. One of the other coordinating papers has a print that is a pattern of hexagons linked together. I hand trimmed them and cut them apart, then scattered them on my pages and spaced them apart in a honeycomb pattern. Honeycombs are very trendy right now!


One of my absolute favorite techniques to use is to stamp on a dark brown, kraft brown, brown bag, or desert sand colored cardstock with an also dark ink- then color it in with white or light colored shades of gel pen ink and colored pencil. The effects are simple and beautiful!


When I created this layout I also kept in mind the inspiration of the "Picture Perfect Challenge" from the Heart 2 Heart blog. The ques I took from the inspiration photo were that repeated shapes, the crisp white against the desert sand brown, the lined up squares of the photos on the wall, and empty space on the wall by the window.


I will add a cricut cut title in Colonial White or Bamboo card stock later. You can easily create a variation on this layout by flipping over the papers to use the other side. This would work with the honeycomb cutouts too, they would be yellow patterend shapes instead.

What I used:
Desert Sand and Bamboo Cardstock
Bamboo and Outdoor Denim Ink
B&T Duo Papers
Card Word Puzzle Stamp Set (Butterfly)
Pemberley Stamp Set (Rope)
White Gel Pen
White Colored Pencil
Yellow Colored Pencil
How to Book, "Magic"
Micro Tip Scissors
Tuesday, February 28, 2012

Pemberley Workshop Preview! Part 2

I couldn't wait to dig into the Pemberley Workshop on the Go Kit and make a 2nd two page layout!


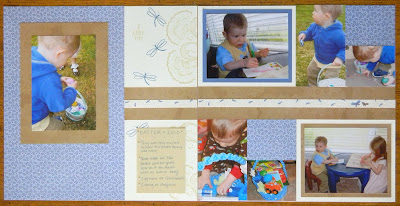
Navy Blue is such a popular color right now, so I was very excited to see what I could create based on that. Scrapbooking is a great way to cure the winter blues! (See what other crafters are creating to Cure their winter blues at the Moxie Fab World Blog).I used "Outdoor Denim" cardstock as the base then built upon it with the B&T Duo papers from Close to my Heart. I cut the paper flower from the patterned paper and used it as an accent in the middle of the photos on the 2nd page. I found a flower in the pattern that did not have any other leaves or petals overlapping on it so that it would look good standing alone. I also added some sponging in outdoor denim ink to the edges of the photo mats.


I found the inspiration for this layout on the blog "Let's Scrap!". This layout was in the gallery. I didn't know the exact measurements so I created my own interpretation. This layout will be home to one 5x7 and four 3 1/2 x 5 photos! My mom loves blue, so I think maybe some photos from Mother's Day or her Birthday would be appropriate for this layout.

Sunday, February 26, 2012

Pemberley Workshop Preview!

The new Workshop on the go Kit named "Pemberley", from Close to my Heart's NEW Idea Book, is a favorite among my friends and customers. I am working on designs for both Scrapbook layouts AND Cards with this kit. I am so excited about how the first layout turned out that I wanted to share it as a preview!


I made a few adjustments to the recommended layout because I didn't want to use both sheets of the b&t duo papers as the base- I wanted to be able to use the other side of the paper on some different projects. So I used Colonial White as my base instead. I use 6" of the yellow print paper and aligned it to the bottom of the pages. I added the navy zip strip along the top of that and then the rest of the layout follows the original recommendations that come in the brochure with the kit.

Layered flowers: We will stamp on pre-cut flower shapes, then bend up the edges of the petals and layer them together before adding three tiny adhesive pearls to the center.

Title is cut with the Art Philosophy Cricut Cartridge. Let me know what title you need to have cut and I can prepare it for you before class!


I will update this post in the coming days to show you some of the other projects I am planning with this Pemberley kit. The workshop, which Rachael and Terry are hosting, is on March 24th. We are taking RSVPs until March 5th, at which point we will need to order supplies. Let me know if you would like to join us!

Here is a link to see the Pemberley Workshop on the Go Kit supplies
Here is a link to view the FaceBook Event for the upcoming Workshop

Email: heatherjanedesign at gmail dot com

Sketch and Color Challenge!


Finding a sketch challenge AND a color challenge to combine was a great way to find some direction on this Thank You card that I wanted to make. I just had to add creativity to HOW I interpreted it.


I used a patterned stamp on the vertical shapes, then smudged the edges by rubbing my stamp pad on them. I layered a couple of stamp images in the square and set the flower on foam tape. Instead of a bow I tied a length of ribbon in one knot onto the ribbon band that is wrapped around the blue card stock.


I based my color choices on the Colour Q challenge. Orange, lime, blue, and grey are not colors I normal grab for to put together. It was fun to work with new colors and I am very happy with how the colors look together!


Follow these links if you want to play along too!
Mojo Monday Sketch Challenge 229
ColourQ 125