Saturday, December 31, 2011

Blog Hop! January Stamp of the Month!

Introducing, "Little Reminder", the Stamp of the Month for January! (From Close to my Heart, CTMH) This is a blog hop where you will be able to click from link to link and see what Consultants have created with this stamp set. It is pretty exciting to see all of the things you can create with this stamp set. You are sure to be inspired!

First, take a look at this fabulous stamp set! Cute numbers! Days of the week! Months! Journal lines! Great phrases!


I used my stamp set to create a Valentine! I put Feb 14th on my circle. I cut the round scallop card with the Art Philosophy cricut cartridge. I set it to 5 1/2 inches. This will fit in our square white envelopes that are 6x6. (Just remember there is a little bit of extra postage to mail square cards). You might recognize the tiny polka dot heart from the December Stamp of the Month!


Mojo221 Sketch Challenge
I created the layout for this card based on the sketch challenge from Mojo Monday. Check it out, maybe you want to play along too!

Now, back to the Hop! If you arrived here from my good friend Casandra's blog then you are on the right track. Now go to Nikka's blog to see what she created!

If you would like to own the January stamp of the month just visit my online website! You can purchase it at the full price of $17.95... OR if you make a $50 purchase you can receive it for just $5.00! Also keep in mind that $25 purchases quality you for the Rock the Block promotion for just $15.00! (A set of decorative blocks in a tray with an E sized stamp set, a great deal!)

Sunday, December 18, 2011

Rock the Block Blog Hop!

Starting December 19th, when you order $25 worth of CTMH products, you are able to purchase this AWESOME Rock the Block special for only $15....you get this stamp set PLUS the My Creations Collage Cubes. This is an item that will be featured in the new Idea Book that will be avialable to shop in February. But, this item is available now, so consider it a "Sneak Peak"! Here's what the E-size stamp set looks like (retail is $29.95 US)

We have over 30 Consultants participating so you should see a lot of different takes on this stamp set as well as the cubes (made of heavy weight white chipboard-like material).


I would like to share my strategy for decorating the blocks. I have a nice area where I can decorate for each season and Holiday. These blocks fit in that space perfectly! So my take on the project was to use the blocks to spell out words. Here are the words I am creating.
-Christmas
-Schmuckal (my last name, exactly 9 letters!)
-Valentine
-EasterEgg
-Birthday (last block is a balloon)
-Halloween

If you've come from Katy's Blog, you're on the right track...

You'll hop on over to Nikka's Blog now and see what she's done with it...

Remember...you can order these starting today (December 19th) through January 31st with a qualifying $25 order!

Tuesday Trigger Card


I have created this card to add to a pack of cards a customer of mine ordered as a Christmas gift for her friend. I was inspired for this project by the "Tuesday Trigger" Challenge on the Moxie Fab World blog. Below is a picture of the inspiration photo.
A partridge in a pear tree was the theme. I focused on the "pear". I used the color pallet of soft grey, blue, white, and ivory. I used tiny crystals to mimic the look of the beading on the pillow. I used emboss resist technique to mimic the embroidered branch from the inspiration item.


What do you think?


Saturday, December 17, 2011

Polka Dot and Flower Card


I have been working on creating a pack of cards that a family member ordered from me as a gift for her friends. I used this week's Mojo Monday Sketch as inspiration for one of the cards. It is fun to have a pattern to go buy when I create cards. I can get right to work, but I can still add my own ideas and style. Let me know what you think of this one!


I used papers from the You and Me kit on a Kraft colored card. I used a sponge and chocolate ink to add depth to the edges of the layers. I used wide striped ribbon as my vertical element. When I layered the circles on top of the scallop it started to look like a flower.


Sunday, December 11, 2011

Wonderland Layout H2H


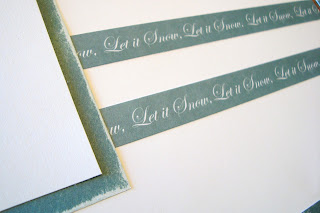
I created this two page scrapbook page layout based upon the sketch Cheryl created for the Heart 2 Heart scrapbooking challenge.  I couldn't wait to cut into my "Wonderland" Kit with this! I was excited to use the zip strips for the two parallel details in the middle. They are just the right scale. There is still room to stamp a title after I find the photos that I want to use on this. I was able to work this layout to be ready to feature 2 horizontal 4x6 photos and 4 vertical 3x5 photos.


I made the edges of my photo mat cardstock pieces look snowed on or frosted with the use of the sanding technique. I used a nail file and sanded down the edges so that the white core would shine through along the sides. I was also excited to use my Art Philosophy Cricut cartridge to cut out snowflakes for embellishments. When I added the round sparkles to the middle of them it really made them pop.


Let me know what you think! Keep an eye on the sketch challenges on the Heart 2 Heart challenge Blog, maybe you will want to play along!

I will be hosting a Scrapbooking workshop in the new year using the Wonderland Kit. Let me know if you would like to attend! Just email me and I can give you more details.

Tuesday, December 6, 2011

New Stamp Technique: "Embossed Resist"

 There are always new and clever ways to use the same supplies we already have on hand. Have you tried "Emboss Resist" before in your stamping? This is so much fun!

Here is what you need:
- A Stamp
- Versa Mark Ink
- Clear Embossing Powder
- Heat Gun
- Card Stock
- Ink
- Sponge, Facial Sponge, or Paper Towel

Steps:
- Stamp image on card stock in Versa Mark Ink
- Cover in clear embossing powder and tap off extra
- Heat with heat gun, let cool
- Dab with colored ink until desired coverage is achieved
- Tada! Your image shows through the ink!

Watch this video from Close To My Heart to see these steps in action!

Fancy Christmas Card


An inspirational photo and a sketch challenge is all I need to get right to work! That is why I created this fancy Christmas Card.

 The layout was created based on the Mojo-Monday Card Sketch Challenge. I was excited to work on this sketch because I rarely think to use an oval. I used the scallop oval chipboard piece from my Art Philosophy Cricut Bundle. I used Pear ink to sponge the edges.


The colors and textures I used were based on the Inspiration photo from the Heart 2 Heart Challenge. I used papers and stamps from the "Believe" Kit. The pieces were left over after I created my Scrap Book Layouts. I added some sparkle with the large and small glittery red and pear brads from the "Jolly Twinkle Brads" I found in the While Supplies Last section of my website. The black ribbon with white polka-dots is from Michaels.


Let me know what you think! These challenges are so much fun and they help me to keep my card pile stocked! Maybe you want to play along too!

Sunday, December 4, 2011

Pretty Birthday Card


I love to create handmade Birthday cards for friends! I love the modern and trendy look of the polka dot paper from the "You and Me" Kit from Close to my Heart. When I paired it with the satin cream ribbon I loved how it looked.


I created the layout of this card based on the Mojo Monday Card Sketch Challenge. Follow the link to see what others have created with the same design in mind. Maybe you will want to play along!

Wonderland Card H2H84


I was playing around with my "Wonderland" kit and decided to create a card with the leftover scraps from creating my Scrap Book Layouts. I really am in love with the mitten from the stamp set that comes with the kit. It is adorable!


I added some prisma glitter to it with the glue pen and cut in between the mittens and up under the string so that I could loop it over the "closeline". I glued the background mitten to the card base and then used the 3D foam tape to pop the foreground mitten. I love how it makes it appear to actually be hanging on the clothesline!


I followed the layout from the Heart 2 Heart Challenge Blog for the design. Follow my link to the H2H Blog to see what others have created with the same layout challenge. Maybe you want to play along too?